React State Control -- React 全局状态管理
React State Control -- React 全局状态管理
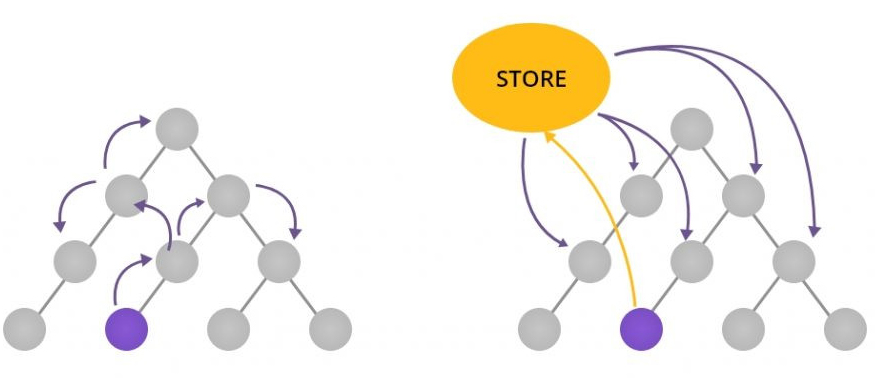
全局状态管理是组件状态管理的另一种思路,传统的组件状态由组件管理,组件状态在组件之间通过 props 传递,传递和更改状态使组件代码变得复杂。
全局状态管理是指组件状态被状态仓库集中管理,组件从仓库中获取状态,组件通过特定方式更改仓库中的状态。
全局状态管理使组件状态共享变得简单。
1. Redux
1.1 概述
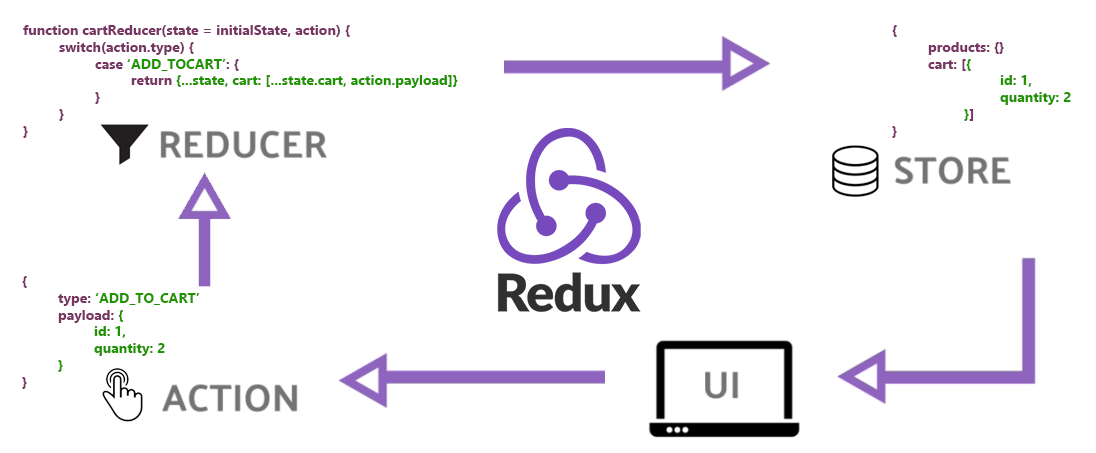
Redux 是最为流行的用于实现全局状态管理的第三方库,它的核心功能是提供了状态管理规则以及相应的状态管理API。
React Redux 是和 Redux 配合使用的,它提供了组件获取状态的方式并在状态更新后更新组件。
npm install redux@4.1.2 react-redux@7.2.6
1.2 光速入门
创建用于存储状态的 Store 对象
// 从 redux 中导入 createStore 方法
// createStore 方法用于创建存储状态的 Store 对象
import { createStore } from "redux";
// createStore 方法的第一个参数是一个函数, 函数函数返回什么, Store 中就存储什么, 我们通常将这个函数命名为 reducer
// createStore 方法的第二个参数是状态的初始值
// createStore 方法的返回值就是用于存储状态的 Store 对象
const store = createStore(reducer, {count: 0});
// 测试代码 -> 获取 store 中存储的状态
console.log(store.getState())
1
2
3
4
5
6
7
8
9创建用于返回状态的 reducer 函数
// reducer 函数的第一个参数是状态
// 状态的初始值就是通过 createStore 方法的第二个参数指定的
// 目前状态的值是一个对象 对象中存储了 count 属性, 值为 0
function reducer(state) {
  // 返回状态, reducer 函数返回什么, Store 对象中就存储什么
  return state;
}
1
2
3
4
5
6
7搭建"天梯",通过"天梯"打通组件从 Store 对象中获取状态的通道
// 从 react-redux 中导入 Provider 组件
// Provider 组件就是"天梯", 有了它组件就可以从 Store 对象中获取状态了
import { Provider } from "react-redux";

// 将天梯组件作为应用的根组件, 这样做以后应用中的任何组件就都可以从 Store 中获取状态了
// 将 store 对象挂载到"天梯"中
ReactDOM.render(
  <Provider store={store}>
    <App />
  </Provider>,
  document.getElementById("root")
);
1
2
3
4
5
6
7
8
9
10
11
12组件从 Store 中获取状态并渲染状态
// 从 react-redux 中导入 useSelector 钩子函数
// 它是用于从 Store 中获取状态的
import { useSelector } from "react-redux";

function App() {
  // 在组件中调用 useSelector 方法从 Store 对象中获取状态
  // 我们在调用 useSelector 方法时需要传递一个回调函数
  // useSelector 方法内部在调用这个函数时通过参数的方式将状态传递给我们, 即当前代码中的 state 参数
  // 我们在拿到 state 参数以后, 可以将它作为回调函数的返回值, 或者再从参数内部找到你想要的状态, 再作为返回值进行返回
  // useSelector 方法的返回值就是回调函数的返回值, 就是我们想要获取的状态值
  const count = useSelector((state) => state.count);
  return <div>{count}</div>;
}
1
2
3
4
5
6
7
8
9
10
11
12
13在组件中通过 dispatch 方法发送更改状态的指令 ( action )
// 从 react-redux 导入 useDispatch 钩子函数
// 该钩子函数用于在组件中获取 dispatch 方法
import { useDispatch } from "react-redux";

function App() {
  // 在组件中通过调用 useDispatch 钩子函数获取 dispatch 方法
  // dispatch 方法用于发送更改状态的指令
  const dispatch = useDispatch();
  // 在点击 div 时调用 dispatch 方法发送用于更改状态的指令
  // 指令就是 action 对象, 通过 action 中的 type 属性描述要对状态进行怎样的操作
  // type 属性的值由开发者自定义
  return <div onClick={() => dispatch({ type: "increment" })}>{count}</div>;
}
1
2
3
4
5
6
7
8
9
10
11
12
13在 reducer 中接收更改状态的指令并根据指令对状态进行更改
// reducer 函数的第二个参数是 action 对象
// 其实就是在调用 dispatch 方法时传递的参数对象 (用于描述如果更改状态的指令)
function reducer(state, action) {
  // 在 reducer 函数中对 action 对象中的 type 值进行匹配
  // 不同的 type 值表示要对状态进行不同的操作
  switch (action.type) {
    // 如果 type 属性值时 "increment", 表示要对当前状态值进行 +1 操作
    case "increment":
      // 对状态进行操作并将操作结果作为 reducer 函数的返回值
      // 返回新的状态, 表示更新 Store 对象中存储的状态值
      // Store 中的状态被更新了会触发使用了该状态的组件的自动更新
      // 注意: 不能对原有状态进行直接修改, 比如 return state.count + 1, 这样的代码不合规, 必须返回新状态对象
      return {count: state.count + 1};
    default:
      // 如果所有的 action.type 都没有匹配上就默认返回当前状态值
      // 切记 reducer 函数一定要有返回值
      return state;
  }
}
1
2
3
4
5
6
7
8
9
10
11
12
13
14
15
16
17
18
19在发送更改状态的指令时传递参数,比如让状态加任意值,我传什么值它就加什么值
function App() {
  // 在 action 对象中除了可以有 type 属性以外, 还可以有其他的自定义属性及值
  // 当前我们就添加一个自定义的 payload 属性作为参数, 值为 5
  // 也就是说当点击 div 时, 让状态在当前值的基础上 +5
  return (
    <div onClick={() => dispatch({ type: "increment", payload: 5 })}>
      {count}
    </div>
  );
}
1
2
3
4
5
6
7
8
9
10function reducer(state, action) { switch (action.type) { case "increment": // 从 action 对象中获取 payload 参数, // 将当前状态值和参数进行相加并返回结果 return {count: state.count + action.payload}; } }1
2
3
4
5
6
7
8
1.3 action creator
需求:在组件中添加两个按钮,点击第一个按钮时让数值 +5,点击第二个按钮时让数值 +10。
你的代码可能会很自然的写成下面这样:
function App() {
  const count = useSelector((state) => state.count);
  const dispatch = useDispatch();
  return (
    <div>
      {count}
      <button onClick={() => dispatch({ type: "increment", payload: 5 })}>
        +5
      </button>
      <button onClick={() => dispatch({ type: "increment", payload: 10 })}>
        +10
      </button>
    </div>
  );
}
2
3
4
5
6
7
8
9
10
11
12
13
14
15
在以上代码中存在一个问题,就是多次调用了 dispatch 方法,每次调用它的都传递了 action 对象,而这个参数对象属于冗余代码,可以被简化。
按照思路我们可以将以上代码改成下面这样,为了简化代码,我们将 action 对象提取了出来。
const increment = { type: "increment", payload: 5 };

function App() {
  const count = useSelector((state) => state.count);
  const dispatch = useDispatch();
  return (
    <div>
      {count}
      <button onClick={() => dispatch(increment)}>+5</button>
      <button onClick={() => dispatch(increment)}>+10</button>
    </div>
  );
}
2
3
4
5
6
7
8
9
10
11
12
13
但是改成这样以后,payload 属性的值就无法动态化了,所以为了传递参数,我们对代码做出了更改。
import { useDispatch, useSelector } from "react-redux";

// action creator 函数: 返回 action 对象的函数
const increment = (payload) => ({ type: "increment", payload });

function App() {
  const count = useSelector((state) => state.count);
  const dispatch = useDispatch();
  return (
    <div>
      {count}
      <button onClick={() => dispatch(increment(5))}>+5</button>
      <button onClick={() => dispatch(increment(10))}>+10</button>
    </div>
  );
}
2
3
4
5
6
7
8
9
10
11
12
13
14
15
16
在 Redux 中,返回 action 对象的函数被叫做 action creator 函数。
1.4 combineReducers
目前在 store 中只存储了一个状态,当 store 中存储多个状态的时候会存在什么问题呢?
需求:新建 Message 组件,该组件负责发送消息,发送的消息需要被存储在 store 中。
// src/Message.js
import { useRef } from "react";
import { useDispatch, useSelector } from "react-redux";

const saveMessage = (payload) => ({ type: "save_message", payload });

function Message() {
  // 和 input 进行绑定, 用于获取用户在文本框中输入的内容
  const inputRef = useRef();
  // 获取用于发送指令的 dispatch 方法
  const dispatch = useDispatch();
  // 从 store 中获取状态
  const message = useSelector((state) => state.message);
  // 用户发送 message 的方法
  const onMessageSendHandler = () => dispatch(saveMessage(inputRef.current.value));
  return (
    <>
      <input ref={inputRef} />
      <button onClick={onMessageSendHandler}>send</button>
      {message}
    </>
  );
}
2
3
4
5
6
7
8
9
10
11
12
13
14
15
16
17
18
19
20
21
22
23
// src/index.js
// 在状态初始值中加入 message
export const store = createStore(reducer, { count: 0, message: "" });
2
3
// src/index.js
function reducer(state, action) {
  switch (action.type) {
    case "increment":
      // 在修改状态时, 要先获取到原有状态, 在原有状态的基础上创建新状态, 返回新状态
      return { ...state, count: state.count + action.payload };
    // 在 reducer 函数中加入处理 message 状态的代码
    case "save_message":
      return { ...state, message: action.payload };
    default:
      return state;
  }
}
2
3
4
5
6
7
8
9
10
11
12
13
以上代码存在两个问题,第一个是当状态变得庞大时 reducer 函数一定会变得庞大,第二个是 reducer 函数在处理多个不相关的状态。
为解决上述问题,为提高代码的可维护性,Redux 允许开发者对状态进行分类,通过编写多个 reducer 函数对不同的状态进行处理。
虽然 Redux 允许存在多个 reducer 函数,但最终 createStore 方法只接收一个,就是说 reducer 函数们最终要被合并,createStore 方法只接收合并结果。
第一步:对 reducer 函数进行拆分,将一个 reducer 函数拆分为多个 reducer 函数
// counter 状态的初始值
// 一个大的 reducer 函数被拆分成了多个小的 reducer 函数,每个 reducer 函数负责处理不同的状态
// 每个 reducer 函数处理的状态又都会有初始值,由于原来的一个状态的初始值变成了现在的多个状态的初始
// 所以这个初始值就不能通过 createStore 方法的第二个参数传递了
// 所以现在状态的默认值改成了通过函数参数默认值的方式进行传递
const counterInitialState = { count: 0 };

// counterReducer 函数用于处理并返回和 counter 相关的状态
function counterReducer(state = counterInitialState, action) {
  switch (action.type) {
    case "increment":
      return { count: state.count + action.payload };
    default:
      return state;
  }
}
2
3
4
5
6
7
8
9
10
11
12
13
14
15
16
const messageInitialState = { value: "" };

// messageReducer 函数用于处理并返回和 message 相关的状态
function messageReducer(state = messageInitialState, action) {
  switch (action.type) {
    case "save_message":
      return { value: action.payload };
    default:
      return state;
  }
}
2
3
4
5
6
7
8
9
10
11
第二步:合并 reducer 函数,因为 createStore 方法要接收最终被合并之后的 reducer 函数。
// combineReducers 方法的参数是一个对象, 这个对象就是 Store 对象中存储的状态对象
// 对象中的属性就是状态属性,属性值就是用于返回状态的 reducer 函数
// 所以现在用于存储状态的 store 对象长成这样: {counter: {count: 0}, message: {value: ""}}
// combineReducers 方法的返回值就是合并好的 reducer 函数, 我们可以将它传递给 createStore 方法
// reducer 函数状态拆分是为了方便代码维护,reducer 函数合并是为了将 reducer 函数作为参数传递给 createStore 方法

// {count: 0, message: ''}
// {counter: {count: 0}, message: {value: ''}}
const reducers = combineReducers({
  counter: counterReducer,
  message: messageReducer,
});
2
3
4
5
6
7
8
9
10
11
12
// 将合并之后的 rootReducer 函数作为 createStore 方法的参数
// 同时去除原本的第二个参数, 状态初始值
export const store = createStore(reducers);
2
3
在组件中重新获取状态,因为 store 对象中存储的数据层级发生了变化。
function App() {
  const count = useSelector((state) => state.counter.count);
}
2
3
function Message() {
  const message = useSelector((state) => state.message.value);
}
2
3
1.5 代码重构
在 src 目录下创建 state 文件夹,用于存放和全局状态相关的代码。
在 state 目录下创建 reducers 文件夹用于存放 reducer 函数
// src/state/reducers/counter.js
const initialState = { count: 0 };

export default function counterReducer(state = initialState, action) {
  switch (action.type) {
    case "increment":
      return { count: state.count + action.payload };
    default:
      return state;
  }
}
1
2
3
4
5
6
7
8
9
10
11// src/state/reducers/message.js const initialState = { value: "" }; export default function messageReducer(state = initialState, action) { switch (action.type) { case "save_message": return { value: action.payload }; default: return state; } }1
2
3
4
5
6
7
8
9
10
11// src/state/reducers/index.js import { combineReducers } from "redux"; import counterReducer from "./counter"; import messageReducer from "./message"; const rootReducer = combineReducers({ counter: counterReducer, message: messageReducer, }); export default rootReducer;1
2
3
4
5
6
7
8
9
10
11在 state 目录新建 store.js 文件,用于存放创建 store 对象的代码。
// src/state/store.js
import { createStore } from "redux";
import reducers from "./reducers";

export const store = createStore(reducers);
1
2
3
4
5在 store 目录下创建 action-creators 文件夹,用于存放 action creator 代码
// src/state/action-creators/counter.js
export const increment = (payload) => ({ type: "increment", payload });
1
2// src/state/action-creators/message.js export const saveMessage = (payload) => ({ type: "save_message", payload });1
2// src/state/action-creators/index.js export * from "./counter"; export * from "./message";1
2
3在 state 目录下新建 index.js 文件,作为 state 文件夹下模块的导入口
export * as actionCreators from "./action-creators";
export * from "./store";
1
2在应用入口文件中导入 store
import { store } from "./state";1在组件中导入 action creator
import { increment } from "./state";
import { saveMessage } from "./state";
1
2
1.6 actionType 常量
action 对象中的 type 属性值是一个字符串,我们要将它抽象成常量值,为什么呢?
- 防止字符串书写错误,因为这个字符串既在 action creator 函数中用到,又在 reducer 函数中用到,而字符串在代码编辑器中是没有提示的。
- 方便修改,在后续的代码编辑中,很可能认识到之前定义的值不合适。
// src/state/action-types/counter.js
export const INCREMENT = "increment";
2
// src/state/action-types/message.js
export const SAVE_MESSAGE = "save_message";
2
// src/state/action-creators/counter.js
import { INCREMENT } from "../action-types/counter";

export const increment = (payload) => ({ type: INCREMENT, payload });
2
3
4
// src/state/action-creators/message.js
import { SAVE_MESSAGE } from "../action-types/message";

export const saveMessage = (payload) => ({ type: SAVE_MESSAGE, payload });
2
3
4
// src/state/reducers/counter.js
import { INCREMENT } from "../action-types/counter";

export default function counterReducer(state = initialState, action) {
  switch (action.type) {
    case INCREMENT:
  }
}
2
3
4
5
6
7
8
// src/state/reducers/message.js
import { SAVE_MESSAGE } from "../action-types/message";

export default function messageReducer(state = initialState, action) {
  switch (action.type) {
    case SAVE_MESSAGE:
  }
}
2
3
4
5
6
7
8
1.7 bindActionCreators
组件:每个组件只要获取状态就都需要获取 dispatch,都需要导入 actionCreator 并传入 dispatch。此处代码可以通过 bindActionCreators 方法简化。
import { useDispatch } from "react-redux";
import { bindActionCreators } from "redux";
import { actionCreators } from "../state";

export const useActions = () => {
  const dispatch = useDispatch();
  return bindActionCreators(actionCreators, dispatch);
};

/**
 * actionCreators 是一个对象,对象中存储了所有的 action creator 函数
 * actionCreators => {increment: (){}, save_message: () {}}
 * bindActionCreators => {increment: dispatch(increment)}
 */
2
3
4
5
6
7
8
9
10
11
12
13
14
1.8 中间件函数
1. 中间件函数概述
默认的 Redux 工作流程只能处理同步状态,但在实际的项目开发中状态的获取、更新、删除等都需要通过异步来实现,那么如何在 Redux 中实现异步呢?
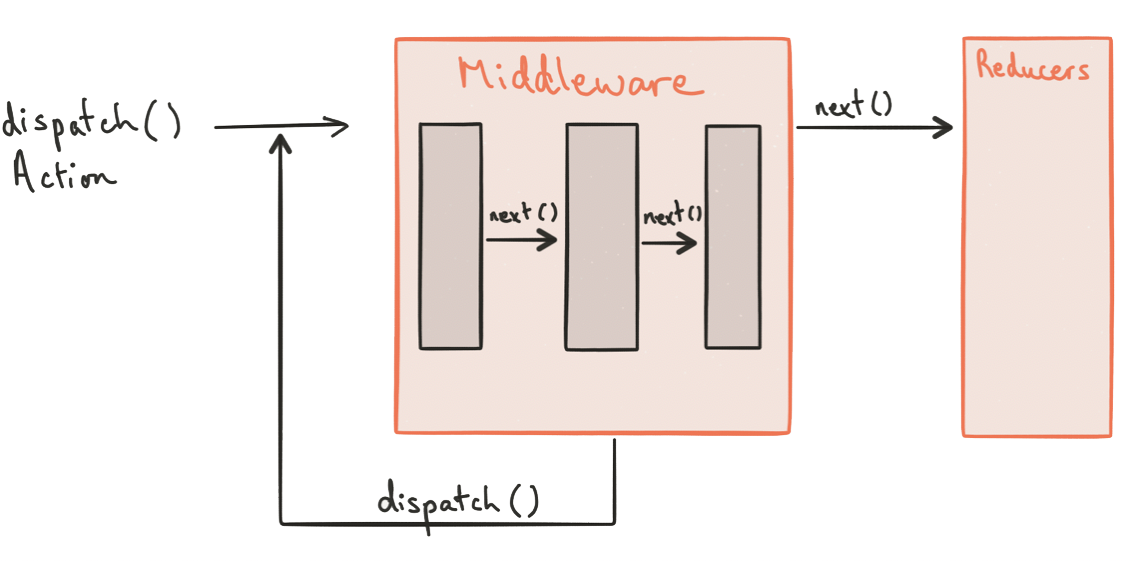
Redux 提供了中间件机制供开发者处理副作用代码,中间件其实就是一堆依次执行的函数,一堆供开发者执行副作用的函数。

创建中间件函数要遵循中间件函数的创建规则,以下是创建中间件函数的模板代码。
function middleware(store) {
  return function (next) {
    return function (action) {
      next(action)
    }
  }
}
// 注意: 当 Action 被触发后,执行的是最里层函数,外层函数是用来传递参数的,只有初始化时执行。
2
3
4
5
6
7
8
2. 创建中间件函数
需求:创建一个用于输出 action 对象的中间件函数,当组件调用 dispatch 方法发送指令时,在控制台输出指令 action 对象。
src/store/middlewares/logger.js
// logger 是中间件的名字, 它的作用是当组件发送操作状态的指令action对象时, 在控制台中输出该 action 对象
const logger = (store) => (next) => (action) => {
  // store, 对象类型, store.dispatch、store.getState
  // 中间件函数内部的自定义逻辑
  console.log(action);
  // 当前的中间件函数执行完成后必须调用 next 方法, 使 redux 流程继续向前走, 否则代码会卡在当前函数中.
  // 调用 next 方法时必须将 action 对象作为参数, 否则下一个中间件函数或者 reducer 就不知道当前要做什么事情了.
  next(action);
};

export default logger;
2
3
4
5
6
7
8
9
10
11
3. 注册中间件函数
src/store/index.js
import { applyMiddleware } from "redux";
import logger from "./middlewares/logger";

export const store = createStore(rootReducer, applyMiddleware(logger));
2
3
4
中间件函数是可以批量注册的,当存在多个中间件时,中间函数是按照 applyMiddleware 方法的参数顺序执行的。
import logger from "./middlewares/logger";
import speak from "./middlewares/speak";

// 先执行 speak, 后执行 logger
export const store = createStore(rootReducer, applyMiddleware(speak, logger));
2
3
4
5
4. 状态调试工具
在谷歌浏览器中安装 Redux DevTools
在应用中安装
redux-devtools-extensionnpm install redux-devtools-extension1在应用中进行配置以开启调试工具
import { composeWithDevTools } from 'redux-devtools-extension';
const store = createStore(reducer, composeWithDevTools(applyMiddleware(thunk)))
1
2
1.9 redux-thunk
1. 基本使用
redux-thunk 是 Redux 官方提供的用于在 Redux 工作流程中加入异步代码的中间件。
需求:向 npm 发送请求加载 npm 包列表信息。
第一步:下载 redux-thunk 中间件
npm install redux-thunk axios
第二步:注册 redux-thunk 中间件
// src/state/store.js
import { applyMiddleware } from "redux";
import thunk from "redux-thunk";

export const store = createStore(reducers, applyMiddleware(thunk));
2
3
4
5
第三步:设计并定义 Action Type
// src/state/action-types/packages.action.type.js
export const SEARCH_PACKAGES = "search_packages";
export const SEARCH_PACKAGES_SUCCESS = "search_packages_success";
export const SEARCH_PACKAGES_ERROR = "search_packages_error";
2
3
4
第四步:在 Reducer 函数中匹配 Action Type 并返回对应的新状态
// src/state/reducers/packages.reducer.js
import {
  SEARCH_PACKAGES,
  SEARCH_PACKAGES_SUCCESS,
  SEARCH_PACKAGES_ERROR
} from "../action-types/packages.action.type.js";

const initialState = {
  list: [],
  loading: false,
  error: null,
};

export default function packagesReducer(state = initialState, action) {
  switch (action.type) {
    case SEARCH_PACKAGES:
      return {
        loading: true,
        error: null,
        list: [],
      };
    case SEARCH_PACKAGES_SUCCESS:
      return {
        loading: false,
        error: null,
        list: action.payload,
      };
    case SEARCH_PACKAGES_ERROR:
      return {
        loading: false,
        error: action.error,
        list: [],
      };
    default:
      return state;
  }
}
2
3
4
5
6
7
8
9
10
11
12
13
14
15
16
17
18
19
20
21
22
23
24
25
26
27
28
29
30
31
32
33
34
35
36
37
第五步:将 packagesReducer 合并到根 reducer
import packagesReducer from "./packages"

export const reducers = combineReducers({
  packages: packagesReducer,
});
2
3
4
5
第六步:创建 Action Creator 函数并在其中完成异步逻辑
在使用了 Redux Thunk 中间件以后,dispatch 方法可以接收一个函数作为参数,也就是说在 Action Creator 函数中可以再返回一个函数,我们需要在这个函数中完成异步操作,在该函数中根据异步流程更改 Store 中对应的状态。
// src/state/action-creators/packages.action.creator.js
import axios from "axios";
import {
  SEARCH_PACKAGES,
  SEARCH_PACKAGES_ERROR,
  SEARCH_PACKAGES_SUCCESS,
} from "../action-types/packages.action.type";

export const searchPackages = (key) => async (dispatch) => {
  dispatch({ type: SEARCH_PACKAGES });
  try {
    const { data } = await axios.get(`https://registry.npmjs.org/-/v1/search`, {
      params: {
        text: key,
      },
    });
    dispatch({
      type: SEARCH_PACKAGES_SUCCESS,
      payload: data.objects.map((item) => item.package.name),
    });
  } catch (error) {
    dispatch({ type: SEARCH_PACKAGES_ERROR, error: error.message });
  }
};
2
3
4
5
6
7
8
9
10
11
12
13
14
15
16
17
18
19
20
21
22
23
24
第七步:在组件中实现对 npm 包的搜索
import { useRef } from "react";
import { useDispatch, useSelector } from "react-redux";
import { searchPackages } from "./state/action-creators/packages.action.creator";

export default function App() {
  const dispatch = useDispatch();
  const packages = useSelector((state) => state.packages);
  const inputRef = useRef();

  const getPackages = () => {
    if (packages.loading) {
      return <div>loading...</div>;
    }
    if (packages.error) {
      return <div>{packages.error}</div>;
    }
    return (
      <div>
        <pre>{JSON.stringify(packages, null, 2)}</pre>
      </div>
    );
  };

  return (
    <>
      <input type="text" ref={inputRef} />
      <button onClick={() => dispatch(searchPackages(inputRef.current.value))}>
        search
      </button>
      {getPackages()}
    </>
  );
}
2
3
4
5
6
7
8
9
10
11
12
13
14
15
16
17
18
19
20
21
22
23
24
25
26
27
28
29
30
31
32
33
2. 实现原理
// createThunkMiddleware 方法用于返回中间件函数
function createThunkMiddleware(extraArgument) {
  // 返回中间件函数
  return ({ dispatch, getState }) => next => action => {
    // 如果 action 是函数类型
    if (typeof action === 'function') {
      // 调用函数并传递相关参数
      return action(dispatch, getState, extraArgument);
    }
    // 如果 action 是对象类型, 调用 next 执行下一个中间件函数
    return next(action);
  };
}
// 调用 createThunkMiddleware 得到中间件函数
const thunk = createThunkMiddleware();

// 暴露获取中间件函数的方法, 用于方便开发者自己传递 extraArgument 参数
thunk.withExtraArgument = createThunkMiddleware;

// 导出默认创建好的 thunk 中间件函数
export default thunk;
2
3
4
5
6
7
8
9
10
11
12
13
14
15
16
17
18
19
20
21
4.1.10 redux-saga
redux-saga 可以将异步操作从 Action Creator 文件中抽离出来,放在一个单独的文件中。
npm install redux-saga
export const SEARCH_PACKAGES = "search_packages";
export const SEARCH_PACKAGES_SUCCESS = "search_packages_success";
export const SEARCH_PACKAGES_ERROR = "search_packages_error";
2
3
import { SEARCH_PACKAGES, SEARCH_PACKAGES_ERROR, SEARCH_PACKAGES_SUCCESS } from "../action-types/packages";

export const search_packages = (payload) => ({type: SEARCH_PACKAGES,payload});
export const search_packages_success = (payload) => ({type: SEARCH_PACKAGES_SUCCESS, payload});
export const search_packages_error = (error) => ({type: SEARCH_PACKAGES_ERROR, error});
2
3
4
5
import axios from "axios";
import { put, takeEvery } from "redux-saga/effects";
import { search_packages_error, search_packages_success } from "../action-creators/packages";
import { SEARCH_PACKAGES } from "../action-types/packages";

function* searchPackages(action) {
  try {
    const { data } = yield axios.get(`https://registry.npmjs.org/-/v1/search`, {
      params: {
        text: action.payload,
      },
    });
    yield put(
      search_packages_success(data.objects.map((item) => item.package.name))
    );
  } catch (error) {
    yield put(search_packages_error(error));
  }
}
// reducer 和 saga 可以同时匹配同一个 action, reducer 先接收, saga 后接收
export default function* packageSaga() {
  yield takeEvery(SEARCH_PACKAGES, searchPackages);
}
2
3
4
5
6
7
8
9
10
11
12
13
14
15
16
17
18
19
20
21
22
23
import { SEARCH_PACKAGES, SEARCH_PACKAGES_ERROR, SEARCH_PACKAGES_SUCCESS } from "../action-types/packages";

const initialState = {
  list: [],
  loading: false,
  error: null,
};

export default function packagesReducer(state = initialState, action) {
  switch (action.type) {
    case SEARCH_PACKAGES:
      return {
        loading: true,
        error: null,
        list: [],
      };
    case SEARCH_PACKAGES_SUCCESS:
      return {
        loading: false,
        error: null,
        list: action.payload,
      };
    case SEARCH_PACKAGES_ERROR:
      return {
        loading: false,
        error: action.error,
        list: [],
      };
    default:
      return state;
  }
}
2
3
4
5
6
7
8
9
10
11
12
13
14
15
16
17
18
19
20
21
22
23
24
25
26
27
28
29
30
31
32
import { useRef } from "react";
import { useDispatch, useSelector } from "react-redux";
import { search_packages } from "../state/action-creators/packages";

function Packages() {
  const inputRef = useRef();
  const dispatch = useDispatch();
  const packages = useSelector((state) => state.packages.list);
  const onClickHandler = () => {
    dispatch(search_packages(inputRef.current.value));
  };
  return (
    <>
      <input type="text" ref={inputRef} />
      <button onClick={onClickHandler}>search</button>
      <pre>{JSON.stringify(packages, null, 2)}</pre>
    </>
  );
}

export default Packages;
2
3
4
5
6
7
8
9
10
11
12
13
14
15
16
17
18
19
20
21
// 合并 saga
import { all } from "redux-saga/effects";
import packageSaga from "./packages";

export default function* sagas() {
  yield all([packageSaga()]);
}
2
3
4
5
6
7
import createSagaMiddleware from "redux-saga";
import sagas from "./sagas";

const sagaMiddleware = createSagaMiddleware();
export const store = createStore(reducers, applyMiddleware(sagaMiddleware));
sagaMiddleware.run(sagas);
2
3
4
5
6
1.11 redux-actions
Redux流程中大量的样板代码读写很痛苦,使用redux-actions可以简化Action和Reducer的处理。
npm install --save redux-actions
import { createAction } from "redux-actions";

// createAction 方法用于创建 Action Creator 函数
// 它在 reducer 函数中也用于 action 对象类型的匹配
export const increment = createAction("increment");

// increment() -> {type: "increment"}
// increment(1) -> {type: "increment", payload: 1}
2
3
4
5
6
7
8
import { handleActions as createReducer } from "redux-actions";
import { increment } from "../action-creators/counter";

const initialState = { count: 0 };

// createReducer 函数用于创建 reducer 函数
// 它的理念是对原有的 reducer 函数中的 switch case 进行拆分, 拆分为多个小的函数
const counterReducer = createReducer(
  {
    [increment]: (state, action) => ({
      ...state,
      count: state.count + action.payload,
    }),
  },
  initialState
);

export default counterReducer;
2
3
4
5
6
7
8
9
10
11
12
13
14
15
16
17
18
2. ReduxToolkit
2.1 概述

ReduxTookit 是 Redux 官方推出的基于 Redux 进行高度封装的工具包,降低了 Redux 的使用难度,使开发者能够用更少的代码完成更多的工作。
ReduxTookit 提供了强大且丰富状态编辑方法,进一步增强了 Redux 对状态进行处理的能力。
ReduxTookit 简化了创建、配置 Store 的各种和应用逻辑无关的代码,比如配置调试工具的代码,配置中间件的代码等等。
ReduxTookit 集成了常用的 Redux 中间件,不需要开发者单独下载,单独配置。
2.2 下载 ReduxToolkit
# 新项目
# Redux + Plain JS template
npx create-react-app my-app --template redux
# Redux + TypeScript template
npx create-react-app my-app --template redux-typescript
2
3
4
5
# 现有项目
npm install @reduxjs/toolkit react-redux
yarn add @reduxjs/toolkit react-redux
2
3
2.3 createAction
createAction 方法用于创建 action creator 函数。
import { createAction } from "@reduxjs/toolkit";

export const increment = createAction("counter/increment");
// increment() => {type: "counter/increment"}
export const decrement = createAction("counter/decrement");
// decrement() => {type: "counter/decrement"}
export const incrementByCount = createAction("counter/incrementByCount");
// incrementByCount(5) => {type: "counter/incrementByCount", payload: 5}
2
3
4
5
6
7
8
2.4 creatReducer
createReducer 方法用于创建 reducer 函数。
// 创建 reducer 函数的第一种写法
import { createReducer } from "@reduxjs/toolkit";
import { decrement, increment, incrementByCount } from "../actions/counter.action";

const initialState = { count: 0 };

const counterReducer = createReducer(initialState, (builder) => {
  builder
    .addCase(increment, (state) => ({ count: state.count + 1 }))
    .addCase(decrement, (state) => ({ count: state.count - 1 }))
    .addMatcher(
      (action) => {
        return (
          action.type === "counter/incrementByCount" &&
          typeof action.payload === "number"
        );
      },
      (state, action) => ({
        count: state.count + action.payload,
      })
    )
    .addDefaultCase((state) => state);
});
2
3
4
5
6
7
8
9
10
11
12
13
14
15
16
17
18
19
20
21
22
23
// 创建 reducer 函数的第二种写法
import { createReducer } from "@reduxjs/toolkit";
import { decrement, increment, incrementByCount } from "../actions/counter.action";

const initialState = { count: 0 };

const counterReducer = createReducer(initialState, {
  [increment]: (state) => ({ count: state.count + 1 }),
  [decrement]: (state) => ({ count: state.count - 1 }),
  [incrementByCount]: (state, action) => ({
    count: state.count + action.payload,
  }),
});
2
3
4
5
6
7
8
9
10
11
12
13
// 创建 reducer 函数的第三种写法
import { createReducer } from "@reduxjs/toolkit";
import { decrement, increment, incrementByCount } from "../actions/counter.action";

const initialState = { count: 0 };

const counterReducer = createReducer(
  initialState,
  // normal reducer
  {
    [increment]: (state) => ({ count: state.count + 1 }),
    [decrement]: (state) => ({ count: state.count - 1 }),
  },
  // matcher reducer
  [
    {
      matcher: (action) => {
        return (
          action.type === "counter/incrementByCount" &&
          typeof action.payload === "number"
        );
      },
      reducer: (state, action) => ({ count: state.count + action.payload }),
    },
  ],
  // default reducer
  (state) => state
);
2
3
4
5
6
7
8
9
10
11
12
13
14
15
16
17
18
19
20
21
22
23
24
25
26
27
28
// 创建 reducer 函数的第四种写法
import { createReducer } from "@reduxjs/toolkit";

const initialState = { count: 0 };

const counterReducer = createReducer(initialState, {
  "counter/increment": (state) => ({ count: state.count + 1 }),
  "counter/decrement": (state) => ({ count: state.count - 1 }),
  "counter/incrementByCount": (state, action) => ({
    count: state.count + action.payload,
  }),
});
2
3
4
5
6
7
8
9
10
11
12
2.5 configureStore
configureStore 方法用于创建 store 对象。
// 导入 configureStore 方法, 用于创建、配置 store 对象
import { configureStore } from "@reduxjs/toolkit";
// 导入 counterReducer 函数, 用于配置 store 对象
import counterReducer from "./reducers/counter.reducer";

// 创建、配置、导出 store 对象
export default configureStore({
  // 是否开启浏览器的 redux 开发者调试工具
  devTools: process.env.NODE_ENV !== "production",
  // reducer 选项用于替换原有的 combineReducers 方法, 用于合并应用中的多个 reducer 函数, 组成最终的 Store 对象
  reducer: {
    counter: counterReducer,
  },
});
2
3
4
5
6
7
8
9
10
11
12
13
14
2.6 createSlice
ReduxToolkit 中的状态切片指的是管理状态、处理状态的地方,就是说原本 Redux 中由 Reducer 函数做的事情现在由状态切片来做。
ReduxToolkit 中可以有很多状态切片,每个状态切片负责处理一类状态,就是说原本 Redux 中的众多小的 Reducer 函数现在变成了众多小的状态切片。
ReduxToolkit 中的状态切片是 Reducer 函数的升级,创建状态切片的 API 会返回 Action Creators 函数和 Reducer 函数,使开发者可以专注于状态的管理。
store/todos.slice.js
// createSlice: 用于创建状态切片
import { createSlice } from "@reduxjs/toolkit";

// actions: 对象类型, 用于存储 action creator 函数, 函数名字和 reducers 配置选项中 reducer 函数的名字相对应
const { actions, reducer: TodoReducer } = createSlice({
  // createSlice 方法将会返回 action creator 函数, action creator 函数将要返回 action 对象
  // 按照约定, action 对象中的 type 属性值应该由两部分组成, 第一部分表示你要处理什么状态, 第二部分表示你要对该状态进行什么处理
  // 这样约定的目的是为了让代码看起来更加的清晰 {type: "todos/addTodo"}
  // name 属性配置的就是 action 对象中 type 属性值的一部分, 表示你要对什么状态进行处理
  name: "todos",
  // initialState 配置的是当前状态切片中状态的初始值
  initialState: [],
  // reducers 对象中配置的是对状态进行处理的 reducer 函数
  // 在原本的 reducer 函数中, 对状态进行的不同的处理是通过 switch case 语句匹配 action.type 属性实现的
  // ReduxToolkit 将原本的 switch case 抽象成了多个 reducer 函数, 每个 reducer 函数对应的就是原本 switch case 中的一种情况
  // 在 ReduxToolkit 中 reducer 函数的名字会作为 action 对象中 type 属性值的第二部分, 这样的话就形成了完整的 type 属性值了
  reducers: {
    // 添加任务
    addTodo(state, action) {
      // 在 ReduxToolkit 中的 reducer 函数里, 可以直接对状态进行处理, 不必拷贝新的状态再对其进行处理
      // 因为 ReduxToolkit 内部集成了不可变数据结构, 此处操作不会改变原有状态
      // 状态处理完成后也不必显式的在 reducer 函数中返回新的处理后的状态, 内部会帮助我们使用新状态替换旧状态
      // action.payload 是 ReduxToolkit 为 action 对象添加的属性, 属性值是调用 action creator 函数时传递的参数
      state.push(action.payload);
    },
  },
});
// 导出 action creator 函数, 供组件使用
export const { addTodo } = actions;
// 导出 reducer 函数, 因为在后续的代码中还是要合并 reducer 函数
export default TodoReducer;
2
3
4
5
6
7
8
9
10
11
12
13
14
15
16
17
18
19
20
21
22
23
24
25
26
27
28
29
30
31
2.7 prepare
当 Action 指令被发出后,ReduxToolkit 允许开发者在 Reducer 函数接收 Action 之前预先对 Action 对象中的 payload 属性值进行预处理。
这样做的目的是抽离组件中和组件无关的逻辑,净化组件代码。
store/todos.slice.js
import { nanoid } from "@reduxjs/toolkit";

createSlice({
  reducers: {
    addTodo: {
      reducer(state, action) {
        state.push(action.payload);
      },
      prepare(payload) {
        return {
          payload: { ...payload,  id: nanoid(), date: new Date },
        };
      },
    },
  },
});
2
3
4
5
6
7
8
9
10
11
12
13
14
15
16
2.8 createAsyncThunk
通过实现 加载服务端任务列表 功能学习 ReduxToolkit 是如何在工作流程中加入异步功能的。
src/store/todos.slice.js
// 导入 createAsyncThunk 方法, 用于处理异步代码
import { createAsyncThunk } from "@reduxjs/toolkit";
// 导入 axios 对象, 用于发送 Ajax 请求
import axios from "axios";

// 调用 createAsyncThunk 方法, 用于处理异步代码
// createAsyncThunk 方法的第一个参数是 action 对象中 type 属性值的前缀, 按照约定, 异步 action 的 type 属性值由三部分构成
// 第一部分表示要对什么状态进行处理, 第二部分表示对状态进行什么处理, 第三部分表示对状态处理的过程进行到哪一步了
// 等待: todos/loadTodos/pending, 成功: todos/loadTodos/fulfilled, 失败: todos/loadTodos/rejected

// createAsyncThunk 方法的第二个参数是函数类型, 用于放置步代码
// 该参数函数有一个 payload 参数, 是调用 action creator 函数时传递的参数

// createAsyncThunk 方法的返回值是 action creator 函数, 调用它并将返回值传递给 dispatch, 可以触发该异步操作的执行
export const loadTodos = createAsyncThunk("todos/loadTodos", (payload) => {
  // 异步操作成功, 返回异步操作结果, 它将会被作为 fulfilled action 的 payload
  // 异步操作失败, 抛出异常, 它将会作为 rejected action 的 error
  try {
    return axios.get(payload).then((response) => response.data);
  } catch (error) {
    throw new Error("自定义错误信息");
  }
});

const { actions, reducer: TodoReducer } = createSlice({
  // 通过 extraReducers 配置项处理异步 action
  extraReducers: {
    // 等待
    [loadTodos.pending]() {
      console.log("loadTodos.pending");
    },
    // 成功
    [loadTodos.fulfilled](state, action) {
      // action.payload: 存储异步操作成功的结果
      action.payload.forEach((todo) => state.push(todo));
    },
    // 失败
    [loadTodos.rejected](state, action) {
      // action.error: 存储异步操作失败的原因
      console.log("loadTodos.rejected");
    },
  },
});
2
3
4
5
6
7
8
9
10
11
12
13
14
15
16
17
18
19
20
21
22
23
24
25
26
27
28
29
30
31
32
33
34
35
36
37
38
39
40
41
42
43
src/components/TodoMain.js
import { useEffect } from "react";
import { useDispatch } from "react-redux";
import { loadTodos } from "../store/todos.slice";

function TodoMain() {
  const dispatch = useDispatch();
  useEffect(() => {
    dispatch(loadTodos("http://localhost:3001/todos"));
  }, [dispatch]);
}
2
3
4
5
6
7
8
9
10
2.9 feature_key
关于状态名称字符串,在多个地方被用到,比如设置状态名称前缀时,创建异步 Action Creator 时,在创建 Store 对象时,在组件中获取状态时,为了保持应用代码的可维护性,ReduxToolkit 官方推荐我们将它抽取成一个常量,然后在每个地方都使用这个常量,当常量值发生变化时每个使用的地方都会得到同步,不会轻易导致程序报错。
src/store/todos.slice.js
export const TODO_FEATURE_KEY = "todos";
createSlice({
  name: TODO_FEATURE_KEY,
});
2
3
createAsyncThunk(
  `${TODO_FEATURE_KEY}/loadTodos`
);
2
3
src/store/index.js
export default configureStore({
  reducer: {
    [TODO_FEATURE_KEY]: TodoReducer,
  }
});
2
3
4
5
src/components/TodoMain.js
function TodoMain() {
  const todos = useSelector((state) => state[TODO_FEATURE_KEY]);
}
2
3
2.10 middleware
在 configureStore 方法的配置对象中,ReduxToolkit 提供了 middleware 选项用来配置中间件,它的值是一个函数,函数中要返回包含中间件的数组。
ReduxToolkit 默认内置了一些中间件,在 middleware 函数的返回值中要包含内置中间件,内置中间件通过函数参数获取。
src/store/index.js
npm i redux-logger
import logger from "redux-logger";

export default configureStore({
  middleware: (getDefaultMiddeware) => {
    return getDefaultMiddeware().concat(logger);
  },
});
2
3
4
5
6
7
2.11 实体适配器
1. 概述
实体指的就是状态,可以将实体适配器理解为状态适配器。
实体适配器是对象类型,开发者必须按照要求的格式将状态存储在其中,实体适配器会提供操作状态的快捷方法,以简化 reducer 中对状态的操作代码。
{
  // The unique IDs of each item. Must be strings or numbers
  ids: []
  // A lookup table mapping entity IDs to the corresponding entity objects
  entities: {}
}
2
3
4
5
6
{
  ids: [1,2,3],
  entities: {
    1: { "id": 1, "title": "吃饭", "isCompleted": false },
    2: { "id": 2, "title": "睡觉", "isCompleted": false },
    3: { "id": 3, "title": "打豆豆", "isCompleted": false }
  }
}
2
3
4
5
6
7
8
2. 创建实体适配器
src/store/todos.slice.js
// createEntityAdapter: 用于创建实体适配器对象
import { createEntityAdapter } from "@reduxjs/toolkit";

// 创建用于存储 todo 任务列表的实体适配器
const todosAdapter = createEntityAdapter();
2
3
4
5
3. 应用实体适配器
src/store/todos.slice.js
const { actions, reducer: TodoReducer } = createSlice({
  // 将实体适配器的初始值作为状态切片的初始状态
  initialState: todosAdapter.getInitialState(),
  reducers: {
    addTodo: {
      reducer(state, action) {
        // 向实体适配器中添加一条状态
        todosAdapter.addOne(state, action);
      }
    },
  },
  extraReducers: {
    [loadTodos.fulfilled](state, action) {
      // 向实体适配器中添加多条状态
      todosAdapter.addMany(state, action);
    },
  },
});
2
3
4
5
6
7
8
9
10
11
12
13
14
15
16
17
18
src/components/TodoMain.js
function TodoMain() {
  const todos = useSelector((state) => state[TODO_FEATURE_KEY].entities);
  return (
    <ul className="todo-list">
      {Object.values(todos).map((item) => ())}
    </ul>
  );
}
2
3
4
5
6
7
8
在实体操作方法的部它会判断如果方法接受到的第二个参数为 action,它会直接找到 action 对象中的 payload属性值,使用它和 state 对象进行交互,所以调用实体操作方法的代码可以简化为以下形式:
createSlice({
  reducers: {
    addTodo: {
      reducer: todosAdaptor.addOne,
    },
  },
  extraReducers: {
    [loadTodos.fulfilled]: todosAdaptor.addMany
  },
});
2
3
4
5
6
7
8
9
10
2.12 状态选择器
状态选择器用于从 store 对象中获取状态并将状态的格式转换为开发者想要的。
src/store/todos.slice.js
import { createSelector } from "@reduxjs/toolkit";

const { selectAll } = todosAdaptor.getSelectors();

export const selectTodos = createSelector(
  (state) => state[TODO_FEATURE_KEY],
  selectAll
);
2
3
4
5
6
7
8
src/components/TodosMain.js
import { loadTodos, selectTodos } from "../store/todos.slice";

const todos = useSelector(selectTodos);
2
3
2.13 RTK Query
1. 概述
RTK Query 是一个强大的状态获取和缓存工具,它可以简化 Redux 应用程序中的状态获取与缓存逻辑。
当从服务器端同步状态时,RTK Query 会将状态作为"缓存"存储在 Redux 存储中。
当对相同的状态执行额外的请求时,RTK Query 将提供现有的缓存数据,而不是向服务器端再次发送请求。
2. createApi
通过 createApi 方法可以创建 API 状态切片,它用于定义请求、返回用于在组件中使用的同步状态的钩子函数。
// src/state/services/api.js
import { createApi, fetchBaseQuery } from "@reduxjs/toolkit/query/react";

export const apiService = createApi({
  // 设置状态存储在 store 中的名字
  reducerPath: "api",
  // baseQuery 选项用于设置请求的公共配置
  baseQuery: fetchBaseQuery({
    // 请求基准 URL
    baseUrl: "http://jsonplaceholder.typicode.com/",
  }),
  endpoints: (builder) => ({}),
});
2
3
4
5
6
7
8
9
10
11
12
13
3. 配置 store
// src/state/store.js
import { configureStore } from "@reduxjs/toolkit";
import { apiService } from "./services";

export const store = configureStore({
  reducer: {
    [apiService.reducerPath]: apiService.reducer,
  },
  middleware(getDefaultMiddles) {
    return getDefaultMiddles().concat(apiService.middleware);
  },
});
2
3
4
5
6
7
8
9
10
11
12
4. 定义获取状态的逻辑
正常来说,请求的定义要写在 endpoints 选项中,但是为了进行代码拆分,我们要根据不同类型的状态将其对应的请求定义拆分到不同的文件中。
// src/state/services/todo.js
import { apiService } from ".";

export const todoService = apiService.injectEndpoints({
  endpoints: (builder) => ({
    // 获取任务列表
    getTodos: builder.query({
      // 定义请求信息
      query: (params) => ({ url: "/todos", params, method: "get" }),
    }),
    // 对响应数据进行转换
    transformResponse: (response, meta, arg) => {
      // 服务器端响应数据
      // console.log(response);

      // 对象类型, 内包含请求对象 request, 响应对象 response
      // console.log(meta);

      // 请求参数对象, 即 params
      // console.log(arg);

      // 该函数中返回什么, 客户端就缓存什么
      return response;
    },
  }),
});

export const { useGetTodosQuery } = todoService;
2
3
4
5
6
7
8
9
10
11
12
13
14
15
16
17
18
19
20
21
22
23
24
25
26
27
28
5. 在组件中同步状态
// src/components/pages/Todo/index.js
import { useGetTodosQuery } from "@state";

export default function Todo() {
  // isLoading: 只有初次加载状态时为true, 后续的每次重新加载都为false
  // error: 请求出错时包含错误信息的对象
  // data: 服务器端返回的状态
  // 优化: 当组件中的其他不相关状态的变化引起组件重新渲染时, 并不会同步状态
  const { data, error, isLoading } = useGetTodosQuery({ _limit: 5, _page: page });
  // 初始加载过程中显示的等待状态
  if (isLoading) return <div>loading....</div>;
	// 请求出现错误后显示的错误信息
  if (error) return <div>{error.error}</div>;
  return <ul> {data && data.map((item) => <li key={item.id}>{item.title}</li>)} </ul>;
}
2
3
4
5
6
7
8
9
10
11
12
13
14
15
6. 同步状态选项
// isFetching: 初次加载状态时为false, 后续的每次重新加载都为true
const { isFetching } = useGetTodosQuery(
  { _limit: 5, _page: page },
  {
    // 间隔 3s 重新发送请求同步状态
    pollingInterval: 3000,
    // 当参数发生变化或者发生组件挂载行为时重新同步状态
    refetchOnMountOrArgChange: true,
    // 当浏览器窗口重新获取焦点时同步状态
    refetchOnFocus: true,
    // 当网络重新链接时同步状态
    refetchOnReconnect: true,
    // 阻止默认同步状态的行为或者根据条件忽略某次同步状态的行为
    // 如果值为 true, 将忽略同步状态的行为
    // 比如组件初次挂载时同步状态的行为, 再比如当页面为3时忽略同步状态的行为
    skip: page === 3,
  }
);
2
3
4
5
6
7
8
9
10
11
12
13
14
15
16
17
18
注意:refetchOnFocus 和 refetchOnReconnect 默认是不生效的,需要做以下配置才可以。
// src/state/store.js
import { setupListeners } from "@reduxjs/toolkit/dist/query";
setupListeners(store.dispatch);
2
3
7. 定义状态突变逻辑
// src/state/services/todo.js
import { apiService } from ".";

export const todoService = apiService.injectEndpoints({
  endpoints: (builder) => ({
    // 删除任务
    removeTodoById: builder.mutation({
      query: (id) => ({
        url: `/todos/${id}`,
        method: "delete",
      })
    })
  }),
});

export const { useRemoveTodoByIdMutation } = todoService;
2
3
4
5
6
7
8
9
10
11
12
13
14
15
16
8. 组件执行状态突变
// src/components/pages/Todo/index.js
import { useRemoveToByIdMutation } from "@state";

export default function Todo() {
  // removeTodoById: 调用该方法执行状态突变
  // result: 突变过程中的状态跟踪及突变结果
  const [removeTodoById, result] = useRemoveToByIdMutation();
  return <button onClick={() => removeToById(item.id)}>delete</button>;
}
2
3
4
5
6
7
8
9
9. 状态突变后更新列表
方式一:在删除操作成功以后重新同步列表状态。
// src/components/pages/Todo/index.js
export default function Todo() {
  // refetch: 调用该方法, 表示重新同步状态
  // 优化: 当组件中的其他不相关状态的变化引起组件重新渲染时, 并不会同步状态
  const { refetch } = useGetTodosQuery();
  const [removeToById, result] = useRemoveToByIdMutation();
	// 监听突变操作是否成功
  useEffect(() => {
    // 重新同步状态
    refetch();
  }, [result.isSuccess, refetch]);
}
2
3
4
5
6
7
8
9
10
11
12
方式二:使列表状态无效,RTK Query 会自动重新同步状态。
// src/state/services/todo.js
export const todoService = apiService.injectEndpoints({
  endpoints: (builder) => ({
    // 获取任务列表
    getTodos: builder.query({
      // 为缓存数据附加标签, 通过标签可以定位到数据从而对数据进行操作
      providesTags: ["todos"],
    }),
    // 删除任务
    removeToById: builder.mutation({
      invalidatesTags: ["todos"],
    }),
  }),
});
2
3
4
5
6
7
8
9
10
11
12
13
14
10. 数据预取
// src/state/services/todo.js
export const { usePrefetch: useTodosPrefetch } = todoService;
2
import { useTodosPrefetch } from "@state";

export default function Todo() {
  const prefetchTodos = useTodosPrefetch("getTodos");

  const prefetchNext = useCallback(() => {
    prefetchTodos({ _page: page + 1, _limit: 5 });
  }, [prefetchTodos, page]);
  return <button onMouseEnter={prefetchNext} onClick={() => setPage((page) => page + 1)}>{page}</button>;
}
2
3
4
5
6
7
8
9
10
3. MobX
4.3.1. 概述
MobX 是一个简单的可扩展的状态管理库,无样板代码风格简约。
目前最新版本为 6,版本 4 和版本 5 已不再支持。
在 MobX 6 中不推荐使用装饰器语法,因为它不是 ES 标准,并且标准化过程要花费很长时间,但是通过配置仍然可以启用装饰器语法。
MobX 可以运行在任何支持 ES5 的环境中,包含浏览器和 Node。
MobX 通常和 React 配合使用,但是在 Angular 和 Vue 中也可以使用 MobX。
4.3.2 核心概念
- observable:被 MobX 跟踪的状态。
- action:允许修改状态的方法,在严格模式下只有 action 方法被允许修改状态。
- computed:根据现有状态衍生出来的状态。
- flow:执行副作用,它是 generator 函数。可以更改状态值。
4.3.3 工作流程

3.4 下载
npm install yarn add mobx@6.3.1 mobx-react-lite@3.2.0
- mobx:MobX 核心库
- mobx-react-lite:仅支持函数组件
- mobx-react:既支持函数组件也支持类组件
3.5 案例驱动之计数器
在组件中显示数值状态,单击[+1]按钮使数值加一,单击[-1]按钮使数值减一。
创建用于存储状态的 Store
export default class CounterStore {
  constructor() {
    this.count = 0
  }
}
1
2
3
4
5创建用于修改状态的方法
export default class CounterStore {
  constructor() {
    this.count = 0
  }
  increment() {
    this.count += 1
  }
  decrement() {
    this.count -= 1
  }
}
1
2
3
4
5
6
7
8
9
10
11让 MobX 可以追踪状态的变化
- 通过 observable 标识状态,使状态可观察
- 通过 action 标识修改状态的方法,状态只有通过 action 方法修改后才会通知视图更新
import { action, makeObservable, observable } from "mobx"

export default class CounterStore {
  constructor() {
    this.count = 0
    makeObservable(this, {
      count: observable,
      increment: action,
      decrement: action
    })
  }
  increment() {
    this.count += 1
  }
  decrement() {
    this.count -= 1
  }
}
1
2
3
4
5
6
7
8
9
10
11
12
13
14
15
16
17
18创建 Store 类的实例对象并将实例对象传递给组件
// App.js
import Counter from "./Counter"
import CounterStore from "../store/Counter"

const counterStore = new CounterStore()

function App() {
  return <Counter counterStore={counterStore} />
}

export default App
1
2
3
4
5
6
7
8
9
10
11在组件中通过 Store 实例对象获取状态以及操作状态的方法
function Counter({ counterStore }) {
  return (
    <Container>
      <Button onClick={() => counterStore.increment()}>
        INCREMENT
      </Button>
      <Button>{counterStore.count}</Button>
      <Button onClick={() => counterStore.decrement()}>
        DECREMENT
      </Button>
    </Container>
  )
}

export default Counter
1
2
3
4
5
6
7
8
9
10
11
12
13
14
15当组件中使用到的 MobX 管理的状态发生变化后,使视图更新。通过 observer 方法包裹组件实现目的
import { observer } from "mobx-react-lite"

function Counter() { }

export default observer(Counter)
1
2
3
4
5简化组件代码
function Counter({ counterStore }) {
  const { count, increment, decrement } = counterStore
  return (
    <Container>
      <Button border="left" onClick={increment}>
        INCREMENT
      </Button>
      <Button>{count}</Button>
      <Button border="right" onClick={decrement}>
        DECREMENT
      </Button>
    </Container>
  )
}
1
2
3
4
5
6
7
8
9
10
11
12
13
14当代码简化后,修改状态的方法中的 this 指向出现了问题,通过 action.bound 强制绑定 this,使 this 指向 Store 实例对象
import { action, makeObservable, observable } from "mobx"

export default class CounterStore {
  constructor() {
    this.count = 0
    makeObservable(this, {
      count: observable,
      increment: action.bound,
      decrement: action.bound
    })
  }
  increment() {
    this.count += 1
  }
  decrement() {
    this.count -= 1
  }
}
1
2
3
4
5
6
7
8
9
10
11
12
13
14
15
16
17
18总结:状态变化更新视图的必要条件
- 状态必须被标记为
observable - 更改状态的方法必须被标记为
action - 组件必须通过
observer方法包裹
- 状态必须被标记为
创建 RootStore
在应用中可存在多个 Store,多个 Store 最终要通过 RootStore 管理,在每个组件都需要获取到 RootStore。
// store/index.js
import { createContext, useContext } from "react"
import CounterStore from "./Counter"

class RootStore {
  constructor() {
    this.counterStore = new CounterStore()
  }
}
const rootStore = new RootStore()
const RootStoreContext = createContext()

export const RootStoreProvider = ({ children }) => {
  return (
    <RootStoreContext.Provider value={rootStore}>
      {children}
    </RootStoreContext.Provider>
  )
}

export const useRootStore = () => {
  return useContext(RootStoreContext)
}
1
2
3
4
5
6
7
8
9
10
11
12
13
14
15
16
17
18
19
20
21
22
23// App.js import { RootStoreProvider } from "../store" import Counter from "./Counter" function App() { return ( <RootStoreProvider> <Counter /> </RootStoreProvider> ) } export default App1
2
3
4
5
6
7
8
9
10
11
12
13import { observer } from "mobx-react-lite" import { useRootStore } from "../store" function Counter() { const { counterStore } = useRootStore() const { count, increment, decrement } = counterStore return ( <Container> <Button onClick={increment}> INCREMENT </Button> <Button>{count}</Button> <Button onClick={decrement}> DECREMENT </Button> </Container> ) } export default observer(Counter)1
2
3
4
5
6
7
8
9
10
11
12
13
14
15
16
17
18
19
20
3.6 案例驱动之 Todo
1. 创建 Store
创建用于管理 Todo 任务的 Store
import { makeObservable, observable } from "mobx"

export default class Todo {
  constructor(todo) {
    this.id = todo.id
    this.title = todo.title
    this.isCompleted = todo.isCompleted || false
    this.isEditing = false
    makeObservable(this, {
      title: observable,
      isCompleted: observable,
      isEditing: observable
    })
  }
}
1
2
3
4
5
6
7
8
9
10
11
12
13
14
15创建用于管理 Todo 任务列表的 Store
import { makeObservable, observable } from "mobx"

export default class TodoStore {
  constructor() {
    this.todos = []
    makeObservable(this, {
      todos: observable
    })
  }
}
1
2
3
4
5
6
7
8
9
10
2. 添加任务
创建向 todo 任务列表中添加 todo 任务的方法
import { action, makeObservable, observable } from "mobx"
import Todo from "./Todo"

export default class TodoStore {
  constructor() {
    this.todos = []
    makeObservable(this, {
      todos: observable,
      addTodo: action.bound
    })
  }
  addTodo(title) {
    this.todos.push(new Todo({ title, id: this.generateTodoId() }))
  }
  generateTodoId() {
    if (!this.todos.length) return 1
    return this.todos.reduce((id, todo) => (id < todo.id ? todo.id : id), 0) + 1
  }
}
1
2
3
4
5
6
7
8
9
10
11
12
13
14
15
16
17
18
19在组件中实现添加任务的逻辑
import { useState } from "react"
import { useRootStore } from "../../store"

function Header() {
  const [title, setTitle] = useState("")
  const { todoStore } = useRootStore()
  const { addTodo } = todoStore
  return (
    <header className="header">
      <input
        value={title}
        onChange={e => setTitle(e.target.value)}
        onKeyUp={e => {
          if (e.key !== "Enter") return
          addTodo(title)
          setTitle("")
        }}
      />
    </header>
  )
}

export default Header
1
2
3
4
5
6
7
8
9
10
11
12
13
14
15
16
17
18
19
20
21
22
23
3. 显示任务列表
import { observer } from "mobx-react-lite"
import { useRootStore } from "../../store"
import Todo from "./Todo"

function Main() {
  const { todoStore } = useRootStore()
  const { todos } = todoStore
  return (
    <section className="main">
      <ul className="todo-list">
        {todos.map(todo => (
          <Todo key={todo.id} todo={todo} />
        ))}
      </ul>
    </section>
  )
}

export default observer(Main)
2
3
4
5
6
7
8
9
10
11
12
13
14
15
16
17
18
19
function Todo({ todo }) {
  return (
    <li>
      <div className="view">
        <input className="toggle" type="checkbox" />
        <label>{todo.title}</label>
        <button className="destroy" />
      </div>
      <input className="edit" />
    </li>
  )
}

export default Todo
2
3
4
5
6
7
8
9
10
11
12
13
14
4 加载远端任务
下载 json-server:
yarn add json-server@0.16.3创建 db.json
{
  "todos": [
    {
      "id": 1,
      "title": "吃饭",
      "isCompleted": false
    },
    {
      "id": 2,
      "title": "睡觉",
      "isCompleted": false
    },
    {
      "id": 3,
      "title": "打豆豆",
      "isCompleted": false
    }
  ]
}
1
2
3
4
5
6
7
8
9
10
11
12
13
14
15
16
17
18
19在 package.json 文件中添加启动命令
"scripts": {
    "json-server": "json-server --watch ./db.json --port 3001"
  }
1
2
3启动 json-server:
npm run json-server在 todoStore 中添加加载任务列表的方法
import axios from "axios"
import { flow, makeObservable, observable } from "mobx"
import Todo from "./Todo"

export default class TodoStore {
  constructor() {
    this.todos = []
    makeObservable(this, {
      todos: observable,
      loadTodos: flow
    })
    this.loadTodos()
  }
  *loadTodos() {
    let response = yield axios.get("http://localhost:3001/todos")
    response.data.forEach(todo => this.todos.push(new Todo(todo)))
  }
}
1
2
3
4
5
6
7
8
9
10
11
12
13
14
15
16
17
18
5. 更改任务状态
在 Todo 类中添加修改任务是否已经完成的方法
export default class Todo {
  constructor() {
    makeObservable(this, {
      modifyTodoIsCompleted: action.bound
    })
  }
  modifyTodoIsCompleted() {
    this.isCompleted = !this.isCompleted
  }
}
1
2
3
4
5
6
7
8
9
10创建
TodoCompleted组件实现逻辑import { observer } from "mobx-react-lite" function TodoCompleted({ todo }) { const { isCompleted, modifyTodoIsCompleted } = todo return ( <input className="toggle" type="checkbox" checked={isCompleted} onChange={modifyTodoIsCompleted} /> ) } export default observer(TodoCompleted)1
2
3
4
5
6
7
8
9
10
11
12
13
14
15在
Todo组件中引用TodoCompleted组件并根据条件决定是否为li添加completed类名import { observer } from "mobx-react-lite" import TodoCompleted from "./TodoCompleted" function Todo({ todo }) { return ( <li className={todo.isCompleted ? "completed" : ""}> <div className="view"> <TodoCompleted todo={todo} /> </div> </li> ) } export default observer(Todo)1
2
3
4
5
6
7
8
9
10
11
12
13
14
6. 删除任务
在
todoStore中添加实现删除任务的方法import axios from "axios" import { action, makeObservable, } from "mobx" export default class TodoStore { constructor() { makeObservable(this, { removeTodo: action.bound }) } removeTodo(id) { this.todos = this.todos.filter(todo => todo.id !== id) } }1
2
3
4
5
6
7
8
9
10
11
12
13创建
TodoDelete组件实现删除 todo 任务逻辑import { useRootStore } from "../../store" function TodoDelete({ id }) { const { todoStore } = useRootStore() const { removeTodo } = todoStore return <button className="destroy" onClick={removeTodo.bind(null, id)} /> } export default TodoDelete1
2
3
4
5
6
7
8
9在
Todo组件调用TodoDelete组件并传入 todo IDimport { observer } from "mobx-react-lite" import TodoDelete from "./TodoDelete" function Todo({ todo }) { return ( <li> <div className="view"> <TodoDelete id={todo.id} /> </div> </li> ) } export default observer(Todo)1
2
3
4
5
6
7
8
9
10
11
12
13
14
7. 编辑任务
在 todoStore 中添加更改任务是否处于编辑状态的方法
import { action, makeObservable } from "mobx"

export default class Todo {
  constructor(todo) {
    makeObservable(this, {
      modifyTodoIsEditing: action.bound,
    })
  }
  modifyTodoIsEditing() {
    this.isEditing = !this.isEditing
  }
}
1
2
3
4
5
6
7
8
9
10
11
12添加
TodoTitle组件展示任务标题并为其添加双击事件,当事件发生时将任务更改为可编辑状态function TodoTitle({ todo }) { const { title, modifyTodoIsEditing } = todo return <label onDoubleClick={modifyTodoIsEditing}>{title}</label> } export default TodoTitle1
2
3
4
5
6在
Todo组件中调用TodoTitle组件,并为li添加editing类名import { observer } from "mobx-react-lite" import TodoTitle from "./TodoTitle" import classnames from "classnames" function Todo({ todo }) { return ( <li className={classnames({ completed: todo.isCompleted, editing: todo.isEditing })} > <div className="view"> <TodoTitle todo={todo} /> </div> </li> ) } export default observer(Todo)1
2
3
4
5
6
7
8
9
10
11
12
13
14
15创建
TodoEditing组件实现编辑 todo 任务标题import { useRef, useEffect } from "react" function TodoEditing({ todo }) { const { title, modifyTodoTitle, isEditing } = todo const ref = useRef(null) useEffect(() => { if (isEditing) ref.current.focus() }, [isEditing]) return ( <input ref={ref} className="edit" defaultValue={title} onBlur={e => modifyTodoTitle(e.target.value)} /> ) } export default TodoEditing1
2
3
4
5
6
7
8
9
10
11
12
13
14
15
16
17
18
19在
Todo组件中调用TodoEditing组件并传递 todo 任务import { observer } from "mobx-react-lite" import TodoTitle from "./TodoTitle" import classnames from "classnames" import TodoEditing from "./TodoEditing" function Todo({ todo }) { return ( <li className={classnames({ completed: todo.isCompleted, editing: todo.isEditing })} > <div className="view"> <TodoTitle todo={todo} /> </div> <TodoEditing todo={todo} /> </li> ) } export default observer(Todo)1
2
3
4
5
6
7
8
9
10
11
12
13
14
15
16
17
8. 计算未完成任务数量
在 todoStore 中添加获取未完成任务数量的派生状态
import axios from "axios"
import { makeObservable, computed } from "mobx"

export default class TodoStore {
  constructor() {
    makeObservable(this, {
      unCompletedTodoCount: computed
    })
  }
  get unCompletedTodoCount() {
    return this.todos.filter(todo => !todo.isCompleted).length
  }
}
1
2
3
4
5
6
7
8
9
10
11
12
13创建
UnCompletedTodoCount组件实现逻辑import { observer } from "mobx-react-lite" import { useRootStore } from "../../store" function UnCompletedTodoCount() { const { todoStore } = useRootStore() const { unCompletedTodoCount } = todoStore return ( <span className="todo-count"> <strong>{unCompletedTodoCount}</strong> item left </span> ) } export default observer(UnCompletedTodoCount)1
2
3
4
5
6
7
8
9
10
11
12
13
14在
Footer组件中调用UnCompletedTodoCount组件import UnCompletedTodoCount from "./UnCompletedTodoCount" function Footer() { return ( <footer className="footer"> <UnCompletedTodoCount /> </footer> ) } export default Footer1
2
3
4
5
6
7
8
9
10
11
9. 任务过滤
在
todoStore中添加存储过滤条件的属性以及更改过滤条件的方法import axios from "axios" import { action, makeObservable, observable, } from "mobx" export default class TodoStore { constructor() { this.filterCondition = "All" makeObservable(this, { modifyFilterCondition: action.bound, filterCondition: observable, }) } modifyFilterCondition(filterCondition) { this.filterCondition = filterCondition } }1
2
3
4
5
6
7
8
9
10
11
12
13
14
15创建
TodoFilter组件,为过滤按钮添加事件以更改过滤条件,根据过滤条件为按钮添加selected类名import classNames from "classnames" import { observer } from "mobx-react-lite" import { useRootStore } from "../../store" function TodoFilter() { const { todoStore } = useRootStore() const { filterCondition, modifyFilterCondition } = todoStore return ( <ul className="filters"> <li> <button onClick={() => modifyFilterCondition("All")} className={classNames({ selected: filterCondition === "All" })} > All </button> </li> <li> <button onClick={() => modifyFilterCondition("Active")} className={classNames({ selected: filterCondition === "Active" })} > Active </button> </li> <li> <button onClick={() => modifyFilterCondition("Completed")} className={classNames({ selected: filterCondition === "Completed" })} > Completed </button> </li> </ul> ) } export default observer(TodoFilter)1
2
3
4
5
6
7
8
9
10
11
12
13
14
15
16
17
18
19
20
21
22
23
24
25
26
27
28
29
30
31
32
33
34
35
36
37
38在
Footer组件中调用TodoFilter组件import TodoFilter from "./TodoFilter" function Footer() { return ( <footer className="footer"> <TodoFilter /> </footer> ) } export default Footer1
2
3
4
5
6
7
8
9
10
11在
TodoStore中添加派生状态,根据条件获取过滤后的 todo 列表import axios from "axios" import { action, flow, makeObservable, observable, computed } from "mobx" import Todo from "./Todo" export default class TodoStore { constructor() { makeObservable(this, { filterTodos: computed }) } get filterTodos() { switch (this.filterCondition) { case "Active": return this.todos.filter(todo => !todo.isCompleted) case "Completed": return this.todos.filter(todo => todo.isCompleted) default: return this.todos } } }1
2
3
4
5
6
7
8
9
10
11
12
13
14
15
16
17
18
19
20
21在 Main 组件获取
filterTodos派生状态import { observer } from "mobx-react-lite" import { useRootStore } from "../../store" import Todo from "./Todo" function Main() { const { todoStore } = useRootStore() const { filterTodos } = todoStore return ( <section className="main"> <ul className="todo-list"> {filterTodos.map(todo => ( <Todo key={todo.id} todo={todo} /> ))} </ul> </section> ) } export default observer(Main)1
2
3
4
5
6
7
8
9
10
11
12
13
14
15
16
17
18
19
10. 清除已完成任务
在
TodoStore中添加清除已完成任务的方法import axios from "axios" import { action, makeObservable, } from "mobx" export default class TodoStore { constructor() { makeObservable(this, { clearCompleted: action.bound }) } clearCompleted() { this.todos = this.todos.filter(todo => !todo.isCompleted) } }1
2
3
4
5
6
7
8
9
10
11
12
13创建
ClearCompleted组件实现清除已完成任务功能import { useRootStore } from "../../store" function ClearCompleted() { const { todoStore } = useRootStore() const { clearCompleted } = todoStore return ( <button className="clear-completed" onClick={clearCompleted}> Clear completed </button> ) } export default ClearCompleted1
2
3
4
5
6
7
8
9
10
11
12
13在
Footer组件中调用ClearCompleted组件import ClearCompleted from "./ClearCompleted" function Footer() { return ( <footer className="footer"> <ClearCompleted /> </footer> ) } export default Footer1
2
3
4
5
6
7
8
9
10
11
4. Recoil
4.1 概述
Recoil 是 Facebook 提供的在 React 中实现全局状态管理的扩展库,目前仍然在实验阶段。
npm install recoil
4.2 RecoilRoot
RecoilRoot 用于为组件提供获取状态的上下文对象。
import ReactDOM from "react-dom";
import App from "./App";
import { RecoilRoot } from "recoil";

ReactDOM.render(
  <RecoilRoot>
    <App />
  </RecoilRoot>,
  document.getElementById("root")
);
2
3
4
5
6
7
8
9
10
4.3 atom
atom 方法用于创建全局状态。
1. 未使用全局状态
import { useState } from "react";

function DarkModeSwitch({ dark, setDark }) {
  return (
    <input
      type="checkbox"
      checked={dark}
      onChange={(event) => setDark(event.target.checked)}
    />
  );
}

function Paragraph({ dark }) {
  const styles = {
    background: dark ? "black" : "white",
    color: dark ? "white" : "black",
  };
  return <p style={styles}>Paragraph ...</p>;
}

function App() {
  const [dark, setDark] = useState(false);
  return (
    <>
      <DarkModeSwitch dark={dark} setDark={setDark} />
      <Paragraph dark={dark} />
    </>
  );
}

export default App;
2
3
4
5
6
7
8
9
10
11
12
13
14
15
16
17
18
19
20
21
22
23
24
25
26
27
28
29
30
31
2. 使用了全局状态
import { atom, useRecoilState, useRecoilValue } from "recoil";

const darkModeState = atom({
  key: "darkModeState",
  default: false,
});

function DarkModeSwitch() {
  const [dark, setDark] = useRecoilState(darkModeState);
  return (
    <input
      type="checkbox"
      checked={dark}
      onChange={(event) => setDark(event.target.checked)}
    />
  );
}

function Paragraph() {
  const dark = useRecoilValue(darkModeState);
  const styles = {
    background: dark ? "black" : "white",
    color: dark ? "white" : "black",
  };
  return <p style={styles}>Paragraph ...</p>;
}

function App() {
  return (
    <>
      <DarkModeSwitch />
      <Paragraph />
    </>
  );
}

export default App;
2
3
4
5
6
7
8
9
10
11
12
13
14
15
16
17
18
19
20
21
22
23
24
25
26
27
28
29
30
31
32
33
34
35
36
37
3. 代码拆分
// src/atoms/darkMode.js
import { atom, useRecoilState, useRecoilValue } from "recoil";

const darkModeState = atom({
  key: "darkModeState",
  default: false,
});

export function useDarkModeState() {
  return useRecoilState(darkModeState);
}

export function useDarkModeValue() {
  return useRecoilValue(darkModeState);
}
2
3
4
5
6
7
8
9
10
11
12
13
14
15
import { useDarkModeState, useDarkModeValue } from "./atoms/darkMode";

function DarkModeSwitch() {
  const [dark, setDark] = useDarkModeState();
  return (
    <input
      type="checkbox"
      checked={dark}
      onChange={(event) => setDark(event.target.checked)}
    />
  );
}

function Paragraph() {
  const dark = useDarkModeValue();
  const styles = {
    background: dark ? "black" : "white",
    color: dark ? "white" : "black",
  };
  return <p style={styles}>Paragraph ...</p>;
}

function App() {
  return (
    <>
      <DarkModeSwitch />
      <Paragraph />
    </>
  );
}

export default App;
2
3
4
5
6
7
8
9
10
11
12
13
14
15
16
17
18
19
20
21
22
23
24
25
26
27
28
29
30
31
32
4.4 selector
selector 表示派生状态,基于现有状态计算新的状态。
import { atom, selector, useRecoilState, useRecoilValue } from "recoil";
// 汇率
const exChangeRate = 0.1572;
// 人民币
const CNYState = atom({
  key: "CNY",
  default: 1,
});
// 根据汇率将人民币转换为美元
const USDSelector = selector({
  key: "USD",
  get: ({ get }) => {
    const CNY = get(CNYState);
    return CNY * exChangeRate;
  },
  // 设置新的美元时重新计算人民币
  set({ set }, newValue) {
    const newCNY = newValue / exChangeRate;
    set(CNYState, newCNY);
  },
});

function App() {
  const [CNY, setCNY] = useRecoilState(CNYState);
  const [USD, setUSD] = useRecoilState(USDSelector);
  return (
    <>
      <input
        type="text"
        value={CNY}
        onChange={(event) => setCNY(event.target.value)}
      />
      <input
        type="text"
        value={USD}
        onChange={(event) => setUSD(event.target.value)}
      />
    </>
  );
}

export default App;
2
3
4
5
6
7
8
9
10
11
12
13
14
15
16
17
18
19
20
21
22
23
24
25
26
27
28
29
30
31
32
33
34
35
36
37
38
39
40
41
42
4.5 data fetching
import axios from "axios";
import { Suspense } from "react";
import { atom, selector, useRecoilState, useRecoilValue } from "recoil";

const userIdState = atom({
  key: "userId",
  default: "",
});

const userState = selector({
  key: "userState",
  get: async ({ get }) => {
    const userId = get(userIdState);
    if (userId) {
      let response = await axios.get(
        `https://jsonplaceholder.typicode.com/users/${userId}`
      );
      return response.data;
    }
  },
});

function User() {
  const user = useRecoilValue(userState);
  return (
    <ul>
      <li>{user.name}</li>
      <li>{user.email}</li>
    </ul>
  );
}

function App() {
  const [userId, setUserId] = useRecoilState(userIdState);
  return (
    <>
      <select
        value={userId}
        onChange={(event) => setUserId(event.target.value)}
      >
        <option value="">请选择用户</option>
        <option value="1">用户一</option>
        <option value="2">用户二</option>
        <option value="3">用户三</option>
      </select>
      {userId && (
        <Suspense fallback={<div>loading...</div>}>
          <User />
        </Suspense>
      )}
    </>
  );
}

export default App;
2
3
4
5
6
7
8
9
10
11
12
13
14
15
16
17
18
19
20
21
22
23
24
25
26
27
28
29
30
31
32
33
34
35
36
37
38
39
40
41
42
43
44
45
46
47
48
49
50
51
52
53
54
55
4.6 selectorFamily
selectorFamily 允许开发者在调用查询时传递参数。
import axios from "axios";
import { Suspense, useState } from "react";
import { selectorFamily, useRecoilValue } from "recoil";

const userState = selectorFamily({
  key: "userState",
  get: (userId) => async () => {
    if (userId) {
      let response = await axios.get(
        `https://jsonplaceholder.typicode.com/users/${userId}`
      );
      return response.data;
    }
  },
});

function User({ userId }) {
  const user = useRecoilValue(userState(userId));
  return (
    <ul>
      <li>{user.name}</li>
      <li>{user.email}</li>
    </ul>
  );
}

function App() {
  const [userId, setUserId] = useState("");
  return (
    <>
      <select
        value={userId}
        onChange={(event) => setUserId(event.target.value)}
      >
        <option value="">请选择用户</option>
        <option value="1">用户一</option>
        <option value="2">用户二</option>
        <option value="3">用户三</option>
      </select>
      {userId && (
        <Suspense fallback={<div>loading...</div>}>
          <User userId={userId} />
        </Suspense>
      )}
    </>
  );
}

export default App;
2
3
4
5
6
7
8
9
10
11
12
13
14
15
16
17
18
19
20
21
22
23
24
25
26
27
28
29
30
31
32
33
34
35
36
37
38
39
40
41
42
43
44
45
46
47
48
49
4.7 catch errors
使用错误边界组件捕获程序执行过程中出现的错误。
npm i react-error-boundary@3.1.4
import axios from "axios";
import { Suspense, useState } from "react";
import { selectorFamily, useRecoilValue } from "recoil";
import { ErrorBoundary } from "react-error-boundary";

const userState = selectorFamily({
  key: "userState",
  get: (userId) => async () => {
    if (userId) {
      let response = await axios.get(
        `https://jsonplaceholder.typicode.com/users/${userId}`
      );
      // 模拟程序出现错误
      if (userId === "4") throw new Error("用户不存在");
      return response.data;
    }
  },
});

function User({ userId }) {
  const user = useRecoilValue(userState(userId));
  return (
    <ul>
      <li>{user.name}</li>
      <li>{user.email}</li>
    </ul>
  );
}

// resetErrorBoundary: 用于重置错误边界
function ErrorFallback({ error, resetErrorBoundary }) {
  return (
    <>
      <p>发生了错误:</p>
      <pre>{error.message}</pre>
      <button onClick={resetErrorBoundary}>重试</button>
    </>
  );
}

function App() {
  const [userId, setUserId] = useState("");
  return (
    <>
      <select
        value={userId}
        onChange={(event) => setUserId(event.target.value)}
      >
        <option value="">请选择用户</option>
        <option value="1">用户一</option>
        <option value="2">用户二</option>
        <option value="3">用户三</option>
        <option value="4">用户四</option>
      </select>
      {/*
          FallbackComponent: 指定发生错误时显示的用户界面
          onReset: 错误边界被重置时执行的回调函数
          resetKeys: 当指定的状态发生更改时重置错误边界
        */}
      <ErrorBoundary FallbackComponent={ErrorFallback} resetKeys={[userId]}>
        {userId && (
          <Suspense fallback={<div>loading...</div>}>
            <User userId={userId} />
          </Suspense>
        )}
      </ErrorBoundary>
    </>
  );
}

export default App;
2
3
4
5
6
7
8
9
10
11
12
13
14
15
16
17
18
19
20
21
22
23
24
25
26
27
28
29
30
31
32
33
34
35
36
37
38
39
40
41
42
43
44
45
46
47
48
49
50
51
52
53
54
55
56
57
58
59
60
61
62
63
64
65
66
67
68
69
70
71
4.8 effects
effects 用于执行副作用。
import { useState } from "react";
import { atom, useRecoilState } from "recoil";

const todoListState = atom({
  key: "todoList",
  default: [],
  effects: [
    ({ setSelf, onSet }) => {
      const storedTodo = localStorage.getItem("todos");
      if (storedTodo) setSelf(JSON.parse(storedTodo));
      onSet((value) => {
        localStorage.setItem("todos", JSON.stringify(value));
      });
    },
  ],
});

function App() {
  const [title, setTitle] = useState("");
  const [todos, setTodos] = useRecoilState(todoListState);
  const addTodo = (event) => {
    if (event.key === "Enter") {
      setTodos([...todos, { title }]);
      setTitle("");
    }
  };
  return (
    <div>
      <input
        type="text"
        value={title}
        onChange={(event) => setTitle(event.target.value)}
        onKeyUp={addTodo}
      />
      <ul>
        {todos.map((todo, index) => (
          <li key={index}>{todo.title}</li>
        ))}
      </ul>
    </div>
  );
}

export default App;
2
3
4
5
6
7
8
9
10
11
12
13
14
15
16
17
18
19
20
21
22
23
24
25
26
27
28
29
30
31
32
33
34
35
36
37
38
39
40
41
42
43
44